Menu Include File
Help!
  [Contents]   [Quick Reference]   [Application preferences]   [Setting up a project]   [Index]

Serving up a home page from scratch

This tutorial will give you step-by-step instructions for creating a very simple home page with Rocket Science and uploading it to your web server. You will create a new project, add the home page file to the project, browse the home page file on your PC, upload the project to your web server and browse the home page on the server. Please note that this tutorial is intended to be a walk-through of the mechanics of setting up a new project, not an in-depth discussion of how Rocket Science works. You can find this type of information in the Project settings, Application Preferences and Overview sections of the manual. There are also links to detailed information at the beginning of each section below.

The tutorial assumes the following:

  • You have installed the Rocket Science software in the c:\website directory; make adjustments whenever you see a reference to this directory if you have installed the software in a different directory.
  • You have told Rocket Science where to find your web browser application, netscape.exe for example. If you have not yet done this, please do so now by accessing the Tools settings section of the Application preferences dialog.
  • You have obtained all of the necessary items required to connect to and transfer files to your web server, such as the URL of your home page (http://something), the server's network name (server1.something.com), etc. If you don't have these items, you can still complete the tutorial up to the point of actually uploading the project, but you will have to supply some dummy values when you create the project.
Ok, let's get started!


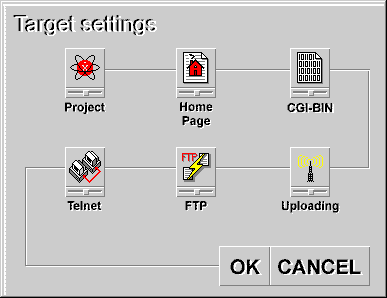
Step 1. Create a new project

We will be creating the new project in the c:\website\examples directory. Go to the Rocket Science project window and select the File/New project file menu item. You will see the Target settings dialog box.

Target settings dialog

There are six areas in the dialog, we will be filling in four of them as we walk through the ections below. As we proceed, you can get a detailed explanation of what's in each of the fields in a particular area and what it's used for by clicking the area name that appears at the beginning of the section.

1. Project settings

  • Click on the Project icon in the Target settings dialog to display the Project settings dialog.
  • Type the name of the project into the Project name field. Let's call it "My project".
  • Type the complete path name of the new project file into the File name field. This will be "c:\website\examples\example.prj"
  • Click the OK button.
2. Home page settings
  • Click on the Home Page icon in the Target settings dialog to display the Home Page settings dialog.
  • If you will be publishing your project to a server, type the URL of your home page into the Web site's URL on server field.
  • If you will be publishing your project to a server, type the name of the server directory in which your home page will be located into the Home directory on server field.
  • If you will be publishing your project to a server, type the file name that your home page will have after it is copied to the server into the Home page's file name on server field. For instance, many service providers require you to use the name "index.html".
  • Type the actual file name of your home page into the Home page's file name on this PC field. Call the home page "index.htm".
  • Click the OK button.
3. Upload settings
  • Click on the Uploading icon in the Target settings dialog to display the Upload settings dialog.
  • Select the method you want to use to set file access permissions by clicking the appropriate radio button in the Set access permissions using box. If you are uploading to a Windows NT server, click the "Do not set permissions" button. If you are uploading to a Unix server, FTP is the best choice and will work on most servers. This instructs Rocket Science to set access permissions using the FTP SITE command. If your Unix FTP server does not support the SITE command, you will need to select the Telnet radio button and fill out the Telnet portion of the Target preferences dialog. You can find more information on this topic in the Q&A section.
  • Specify the access permissions for each type of file in your project in the Access permissions box. The default values are correct for most servers.
  • Specify the manner in which upload errors should be handled by checking the appropriate boxes in the Stop upload if box. If you don't care, use the default settings.
  • If your service provider requires you to append identification text to your file names when you upload files (your User ID, for example) type the text into the Append this to all file names field.
  • Click the OK button.
4. FTP settings

Rocket Science uses FTP to upload your project to the server, and optionally to set the access permissions on your files. If you don't have your FTP information, you will not be able to upload your project to the server, and you must make up a value for the Host name since it is a required field.

  • Click on the FTP icon in the Target settings dialog to display the FTP settings dialog.
  • Enter the values that you received from your service provider for establishing an FTP session with your server. If you have already stored one or more default FTP configurations using the Application preferences dialog, you can click on the Setup name combo box to fill the FTP settings from a default configuration.

  • Click the OK button.
At this point, the Save pushbutton in the Target settings should be enabled. Press the OK button to create the new project file. In the Rocket Science project window, you will see that the publication target is named "My project". Next, you will add an HTML file to the target.


Step 2. Add the home page to the project

We have stored an HTML file in the c:\website\examples directory to use with this tutorial. Go to the Project Window and click on the target "My project" to select it. Now click the right mouse button and select Add HTML file... from ths speed menu; Rocket Science will display the Select file dialog. In the Select file dialog, select the file "c:\website\examples\index.htm" and press the Select button to add it to the target. If you select the HTML file in the folder pane by clicking on it with the mouse, you will see the files that it references displayed in the document pane.


Step 3. Browse the home page on the PC

Go to the Project Window and select the Project/Browse/Web site from project directory menu item. This will launch your web browser application and direct it to load the file "c:\website\examples\index.htm".


Step 4. Upload the project to the web server

If you filled in the host information when you created the project (items 2 through 4 above) you can go to the Project Window now and select the Project/Publish/Upload project to server(s) menu item to send your project to the web server. If you have trouble while uploading the project, it will probably be a problem with the FTP and/or Telnet settings that you entered in steps 2 through 4 above; use the Messages window to troubleshoot your setup. Remember, the FTP and Telnet settings in Rocket Science are the same as those that you would use to connect to your service provider with any other FTP or Telnet application. If they work in an external application (WS_FTP.EXE, for example) then they will work in Rocket Science.


Step 5. Browse the home page on the server

Go to the Project Window and select the Project/Browse/Web site on server menu item. This will launch your web browser application and direct it to load the Home page URL on server that you specified in the Home Page dialog in step 1 above.

Copyright Include File
A Modern Space Age Communication from Atomic Softworks. © Copyright 1999 Atomic Softworks. All rights reserved worldwide. Please send feedback and inquiries to info@atomicsoftworks.com.