Target settings
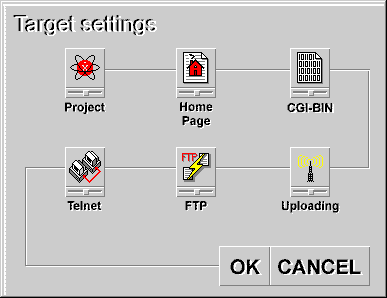 The Target settings dialog box is used to create new Rocket Science projects and to change the properties of publication targets within existing projects. The dialog is accessed from the Project Window.
- To change the settings of a target in an existing project, right-click on the target and select Properties... on the speed menu. The Target settings dialog will be displayed.
- To create a new project from scratch, select the File/New project file menu item. The Target settings dialog will be displayed.
- To import the contents of a directory as a new project, select the File/Import/Directory as new project file... menu item. The Target settings dialog will be displayed.
- To import a web site as a new project, select the File/Import/Web site as new project file... menu item. The Target settings dialog will be displayed.
The Target settings dialog displays the various areas of a target that can be configured. Each area is displayed as an icon, and a line runs through each icon beginning with the Project icon and ending at the OK and CANCEL buttons. Start at the Project icon and follow the line through each of the icons until you arrive at the OK and CANCEL buttons. When you click on an icon, a dialog will be displayed which will allow you to configure that area of your project.
Hint: Some of the areas in the dialog (FTP, Telnet and Uploading) have corresponding areas in the Application Preferences dialog where you can set up defaults that will then be copied into any new projects you create. For example, if you have more than one web site on a particular server, you will probably want to set up your FTP log-in information in the Application Preferences dialog so that you don't have to re-type it every time you create a new project. You can then modify the FTP information for the new project without affecting the application-wide copy.
Some of the fields in the dialogs are required fields, meaning that you MUST enter information into the field before you you can save your settings. Required fields are indicated with an asterisk (*).
Following is a description of each of the areas that you can set up:
Project settings
 When editing a target in an existing project:
- Target name: This is the name that is associated with the publication target (the first item in the Folder Pane in the Project Window). The name appears next to the target in the Project Window. You can call the target anything you want, like "My web site", as it's used for descriptive purposes only. This is a required field.
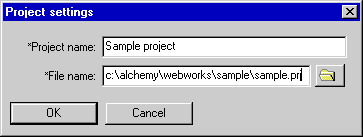 When creating a new project from scratch:
- Project name: This is the name that is associated with the publication target (the first item in the Folder Pane in the Project Window). The name appears next to the target in the Project Window. You can call the target anything you want, like "My web site", as the name is used for descriptive purposes only. This is a required field.
- File name: This is the full path name of the new project file, as in "c:\mydir\mysite.prj". When you create a new project, the directory in which this file resides is referred to as the Project directory. This is where your web site's home page is located. Rocket Science project files should end with a .prj extension so that Rocket Science can find them. This is a required field.
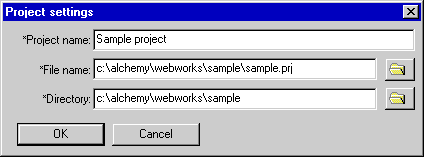 When importing a directory as a new project:
- Project name: This is the name that is associated with the publication target (the first item in the Folder Pane in the Project Window). The name appears next to the target in the Project Window. You can call the target anything you want, like "My web site", as the name is used for descriptive purposes only. This is a required field.
- File name: This is the full path name of the new project file, as in "c:\mydir\mysite.prj". When you create a new project, the directory in which this file resides is referred to as the Project directory. This is where your web site's home page is located. Rocket Science project files should end with a .prj extension so that Rocket Science can find them. This is a required field.
- Directory: This is the full path to the directory which contains the HTML files you want to import, as it "c:\mydir". Rocket Science will import any HTML files that it finds in this directory, along with any files that they reference (.GIFs, etc.) into your new project and will copy the files into your Project Directory. This is a required field.
When importing a web site as a new project:
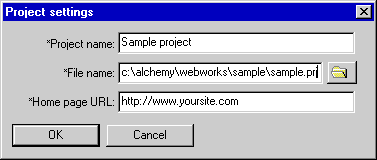
- Project name: This is the name that is associated with the publication target (the first item in the Folder Pane in the Project Window). The name appears next to the target in the Project Window. You can call the target anything you want, like "My web site", as the name is used for descriptive purposes only. This is a required field.
- File name: This is the full path name of the new project file, as in "c:\mydir\mysite.prj". When you create a new project, the directory in which this file resides is referred to as the Project directory. This is where your web site's home page is located. Rocket Science project files should end with a .prj extension so that Rocket Science can find them. This is a required field.
- Home page URL: This is the URL of the web site's home page, for example "http://www.mysite.com". Rocket Science assumes that the name of the home page is "index.html", so in the above example it will attempt to retrieve the file "http://www.mysite.com/index.html". If the home page is not named "index.html", you should specify the entire URL + home page name (i.e., "http://www.mysite.com/pageone.html"). Rocket Science will import any HTML files that it finds at this address on the server, along with any files that they reference (.GIFs, etc.) into your new project and will copy the files into your Project Directory. This is a required field.
Home page settings
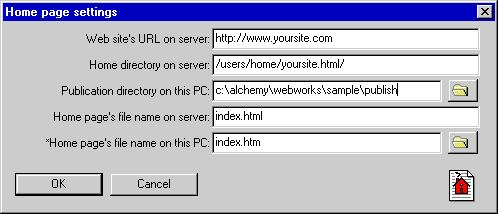 This section is used to tell Rocket Science which file contains your home page and where your project will be located when it is published. Rocket Science allows you to set up a project so that you can publish it to a web server and/or a local directory. If you will only be publishing to a server, you do not need to fill in the local directory fields. If you will only be publishing to a local directory (for CD-ROM publication, for example) you do not need to fill in the server-related fields. In order to publish your project, you MUST fill in either the server-related or local directory-related information.
- Web site's URL on server: If you are publishing to a web server, this is the URL at which the web site can be found. Rocket Science passes this URL to your web browser application when you select the Project/Browse/Web site on server menu item. If you do not fill in this field, you will not be able to automatically browse your web site on the server from within Rocket Science.
- Home directory on server:If you are publishing to a web server, this is the host directory in which your home page is stored. When you select the Project/Publish/Upload project to server(s)... menu item, Rocket Science will transfer files from your project directory into this directory via FTP, expanding and replacing X/Pander tags as it does so. Note that this is a Unix directory name, NOT a URL. Your ISP can supply you with the correct name of this directory. Make sure you specify the correct directory here or your web site will end up in the wrong place on the server! If you do not fill in this field, you will not be able to automatically upload your files to a server since Rocket Science will not know where to put them.
- Publication directory on this PC:If you are publishing to a local directory (for CD-ROM, for example), this is the local directory in which your home page is stored. When you select the Project/Publish/Publish project to publication directory(s)... menu item, Rocket Science will copy files from your project directory into this directory, expanding and replacing X/Pander tags as it does so. When you select the Project/Browse/Web site on server menu item, Rocket Science passes the name of the home page file in this directory to your web browser application. If you do not fill in this field, you will not be able to automatically publish your files to a directory since Rocket Science will not know where to put them.
- Home page's file name on server: If you are publishing to a web server, this is the name of the home page as it will appear on the server. You do not need to fill in this field if the home page name is the same on the server as it is on your PC. The most commonly used name is "index.html" or "index.htm". This field is mainly for Windows 3.x users who must use 8.3 file names. If you are running on Windows 3.x, you should probably enter "index.html" here and "index.htm" in the next field (see below). For more information about this field, see the Overview section.
- Local file name: The name of the file in the project directory which contains the home page for your web site. The most commonly used name is "index.html" or "index.htm". This is a required field. For more information about this field, see the Overview section. If you are running on Windows 3.x, you should probably enter "index.htm" here. If you are running on Windows 95, you should probably enter "index.html" here.
CGI-BIN settings
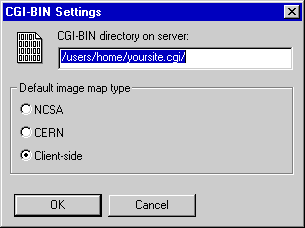 This section lets you specify the location of your web server's CGI-BIN directory (if any) and the type of web server you are using. If you are publishing for CD-ROM only, or are not using any CGI-BIN files in your project, you can probably skip the CGI-BIN directory name but you should still specify a default image map type. This will most likely be "Client side image maps".
- CGI-BIN directory on server: The host directory in which your CGI-BIN files are stored. This will be used to upload your files to the server via FTP, so it is an actual Unix directory name rather than a URL. For example, let's say that you have a form which invokes a server-based Perl script to process the contents of the fields using the code "<FORM METHOD="http://www.atomicsoftworks.com/cgi-bin/getform.pl">. You would not use the URL "http://www.atomicsoftworks.com/cgi-bin/", but rather the directory on the server to which the URL refers, which would look something like "/users/home/mycgistuff.cgi/". You do not need to fill this field in if you do not use and CGI-BIN scripts or executables in your project.
- Default image map type: The default type of image map you'll be using in this project. The X-Map Image Map Editor can create server-side image map files for NCSA-and CERN-style servers as well as client-side image maps. The image map type that you specify here is used by X-Map as the default when creating new image maps, but you can still create image maps in any of the formats that are supported by the editor. Netscape and MS Internet Explorer browsers both support client-side image maps, so check this option if you are building a Netscape- or MSIE-centric project.
Telnet settings
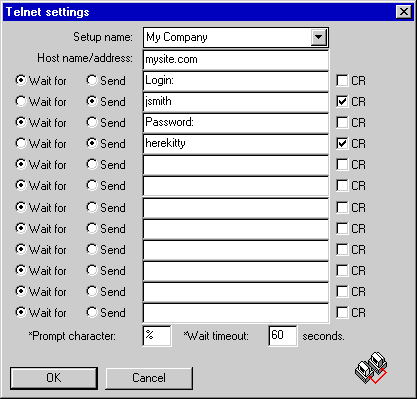 This section lets you configure the Telnet settings which Rocket Science will use when uploading your project to a server (a.k.a. your host) and to automatically connect to a host for a terminal emulator session from the Telnet Session Window. If you will not be publishing to a server (i.e, you are developing for CD-ROM only) then you can skip this area altogether. You will probably want to use Telnet at some point to perform maintenance on your server-based files (deleting old files, etc.), but you probably will not need it to upload your project to a server. If your host's FTP server supports the FTP SITE command (more below) then you will NOT need Telnet for project uploads. If your host does NOT support the SITE command, then you will need to use Telnet to set the access permissions on your directories and HTML, graphics, (etc.) files, and you will also have to specify Set access permissions using Telnet in the Uploading section (see below).
When you select the Host/Connect menu item or press the Connect toolbar button in the Telnet Session Window, Rocket Science uses the settings that you specify here to automatically connect to the host's Telnet port. What you are essentially doing is creating a log-in script. If you have a shell/SLIP/PPP account, the values that you provide here are exactly the same as those that you use to connect to your service provider. If you are using Trumpet Winsock (or something similar) you should pull these values out of your current log-in script.
- Setup name: In the Application preferences dialog, you can create and store different Telnet configurations for use when configuring projects. This makes sense for authors who are maintaining or developing web sites on several different servers or who have multiple web sites on the same server. If you have stored Telnet configurations, you can click on the Setup name combo box now to select a stored configuration and to automatically fill in the fields.
- Host name/address: The host name, as in "atomicsoftworks.com", or host address, as in "204.222.21.1".
- Wait for: Wait for the host to send us this text before continuing.
- Send: Send this text to the host.
- CR: Append a carriage return to the text when sending it to the host.
- Prompt character: This is the last character of the command prompt which is used by your host. Rocket Science uses this while setting file access permissions to determine that the host is ready to accept a command. To find out what this character is, start a Telnet session with your host and look at the last character of the command prompt. Note: If you use Telnet to set file access permissions when uploading your project to the host and do not specify the correct value for this field, your upload will fail with a timeout error.
- Wait timeout: The maximum number of seconds to wait for a reply after sending a command to the host, as in "30". If you use a low value here, you may find that you need to adjust it periodically depending on server traffic, etc., so we recommend a minimum value of 30 seconds. The intent of this field is to allow you to determine your patience level rather than having us do it for you, since servers sometimes don't respond for 5 minutes or more if they're having a bad day.
FTP settings
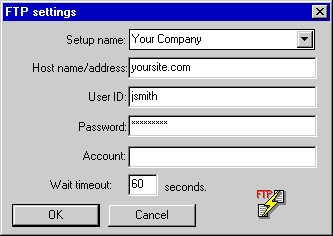 This section lets you configure the File Transfer Protocol (FTP) settings which Rocket Science will use to upload your project to your web server (a.k.a. your host) and to automatically connect to the host for an FTP session from within the FTP Session Window. If you will not be publishing to a server (i.e, you are developing for CD-ROM only) then you can skip this area altogether. When you select the Project/Publish/Upload project to server(s)... menu item or press the Upload project to web server(s) toolbar button in the Project Window, Rocket Science uses the settings that you supply here to connect to the host's FTP server and upload your HTML, graphics, etc. files to it. When you select the Host/Connect menu item or press the Connect toolbar button in the FTP Session Window, Rocket Science uses the settings that you specify here to automatically connect to the host's FTP port. If you have a shell/SLIP/PPP account, the values that you provide here are the same ones that you use to connect to your service provider. Note that not all FTP servers require a password or account, so check with your service provider if you have questions.
- Setup name: In the Application preferences dialog, you can create and store different FTP configurations for use when configuring projects. This makes sense for authors who are maintaining or developing web sites on several different servers or who have multiple web sites on the same server. If you have stored FTP configurations, you can click on the Setup name combo box now to select a stored configuration and to automatically fill in the fields.
- Host name/address: The host name, as in "atomicsoftworks.com", or host address, as in "204.222.21.1".
- User ID: Your user ID as provided by your ISP, as in "jjones".
- Password: Your password (if any) as provided by your ISP, as in "secret".
- Account: Your account (if any) as provided by your ISP, as in "mygroup".
- Wait timeout: The maximum number of seconds to wait for a reply after sending a command to the host, as in "30". If you use a low value here, you may find that you need to adjust it periodically depending on server traffic, etc., so we recommend a minimum value of 30 seconds. The intent of this field is to allow you to determine your patience level rather than having us do it for you, since servers sometimes don't respond for 5 minutes or more if they're having a bad day.
Upload settings
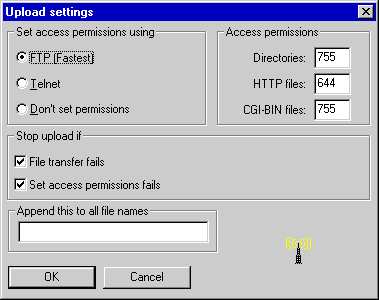 This section lets you specify defaults for the way in which Rocket Science will handle your project files when uploading them to a web server. If you will not be publishing to a server (i.e, you are developing for CD-ROM only) then you can skip this area altogether.
Traditionally, there are three steps involved in storing documents on a web server so that they can be accessed by a web browser. First, you must create the directories in which the files will be stored. Second, you must copy the files to the server. Third, if you are uploading to a Unix server, you must set the Uix access permissions for each of the directories and files so that they can be accessed by the web server and sent to a web browser. Rocket Science will take care of all of these items for you automatically, but you need to tell it how you want your files to be processed. note that as with FTP and Telnet settings, you can configure this information once in the Application Preferences dialog, and it will be automatically copied into any new projects that you create.
Set access permissions using:
- FTP* Set Unix file permissions using the FTP SITE command, as in "SITE chmod 644 index.htm". This is the preferred method, as it is faster and more reliable than Telnet. If your FTP server supports the SITE command, you should definitely use this method. If your Unix server does NOT support the SITE command then you will have to use Telnet (see below).
- Telnet Set Unix permissions using Telnet. After all files have been uploading using FTP, Rocket Science will establish a Telnet session with the host and set access permissions using the "chmod" command at the command prompt. This method is slower and not as reliable as FTP, but you will have to use it if your Unix FTP server does not support the FTP SITE command.
- Don't set permissions Rocket Science will not attempt to set access permissions if this option is selected. You should use this option if you are uploading to a Windows NT server or any other server that does not require or allow you to set access permissions.
Permissions for Unix servers:
- Directories: This value will be used as the access permission for any server directories which are created by Rocket Science (i.e., the home directory or CGI-BIN directory).
- HTTP files:This value will be used as the access permission for all files which are uploaded to the home directory.
- CGI-BIN files:This value will be used as the access permission for all files which are uploaded to the CGI-BIN directory.
Stop upload if:
- File transfer fails Check this box if you want the project upload halted when an FTP STOR command fails; this will allow you to fix the error and try again, resuming where you left off. If this box is not checked and Rocket Science is unable to transfer a file to your web server, it will log the error and continue with the next file in the project.
- Set access permissions fails Check this box if you want the project upload halted when a Telnet or FTP chmod command fails; this will allow you to fix the error and try again, resuming where you left off. If this box is not checked and Rocket Science is unable to set access permissions for a file or directory, it will log the error and continue with the next file in the project.
Append this to all file names:
- Some service providers such as Geocities require that you append a special identifier to the name of each file that you upload to their server (your user ID, for example). Rocket Science uses the information in this field to append the identifier automatically during project uploads. For example, if you enter ".jjones" in this field and upload the file "myfile.gif", Rocket Science will create the file "myfile.gif.jjones" on the server.
*Note: how to tell if your FTP server supports the SITE command:
There are several ways to determine whether or not you can set access permissions using FTP.
- Ask your service provider
- Try it - Establish a command-line FTP session with your server and issue the SITE command. If you get the message "Command not implemented." or something similar, then your FTP server does not support the SITE command.
- Check the Rocket Science log - The first time you upload your project using Rocket Science, set the Set access permissions using: value to FTP. If the upload fails, check the Rocket Science Messages window. If you see the message "SITE command not implemented." or something similar, then your FTP server does not support the SITE command.
|
 The Target settings dialog box is used to create new Rocket Science projects and to change the properties of publication targets within existing projects. The dialog is accessed from the Project Window.
 When editing a target in an existing project:
 When creating a new project from scratch:
 When importing a directory as a new project:
 This section is used to tell Rocket Science which file contains your home page and where your project will be located when it is published. Rocket Science allows you to set up a project so that you can publish it to a web server and/or a local directory. If you will only be publishing to a server, you do not need to fill in the local directory fields. If you will only be publishing to a local directory (for CD-ROM publication, for example) you do not need to fill in the server-related fields. In order to publish your project, you MUST fill in either the server-related or local directory-related information.
 This section lets you specify the location of your web server's CGI-BIN directory (if any) and the type of web server you are using. If you are publishing for CD-ROM only, or are not using any CGI-BIN files in your project, you can probably skip the CGI-BIN directory name but you should still specify a default image map type. This will most likely be "Client side image maps".
 This section lets you configure the Telnet settings which Rocket Science will use when uploading your project to a server (a.k.a. your host) and to automatically connect to a host for a terminal emulator session from the Telnet Session Window. If you will not be publishing to a server (i.e, you are developing for CD-ROM only) then you can skip this area altogether. You will probably want to use Telnet at some point to perform maintenance on your server-based files (deleting old files, etc.), but you probably will not need it to upload your project to a server. If your host's FTP server supports the FTP SITE command (more below) then you will NOT need Telnet for project uploads. If your host does NOT support the SITE command, then you will need to use Telnet to set the access permissions on your directories and HTML, graphics, (etc.) files, and you will also have to specify Set access permissions using Telnet in the Uploading section (see below).
 This section lets you configure the File Transfer Protocol (FTP) settings which Rocket Science will use to upload your project to your web server (a.k.a. your host) and to automatically connect to the host for an FTP session from within the FTP Session Window. If you will not be publishing to a server (i.e, you are developing for CD-ROM only) then you can skip this area altogether. When you select the Project/Publish/Upload project to server(s)... menu item or press the Upload project to web server(s) toolbar button in the Project Window, Rocket Science uses the settings that you supply here to connect to the host's FTP server and upload your HTML, graphics, etc. files to it. When you select the Host/Connect menu item or press the Connect toolbar button in the FTP Session Window, Rocket Science uses the settings that you specify here to automatically connect to the host's FTP port. If you have a shell/SLIP/PPP account, the values that you provide here are the same ones that you use to connect to your service provider. Note that not all FTP servers require a password or account, so check with your service provider if you have questions.
 This section lets you specify defaults for the way in which Rocket Science will handle your project files when uploading them to a web server. If you will not be publishing to a server (i.e, you are developing for CD-ROM only) then you can skip this area altogether.