The Project Window is the nerve center of Rocket Science, and displays a graphical overview of your project in two window panes. The pane on the left is the Folder pane, which contains a directory tree-style view of your project's folders and HTML files. The pane on the right is the Document pane, which displays the contents of the currently selected folder. You can view and/or edit files in your project from either pane by:
- Double-clicking on an item with the left mouse button
- Selecting an item and clicking the right mouse button to display the speed menu
- Selecting an item and pressing the Enter key
- Clicking on an item with the left mouse button and dragging it to an application window
- Selecting the appropriate item under the Project pulldown menu
Hint: Don't forget about the speed menu which is accessed by clicking the right mouse button; it's the fastest and easiest way to work with items within most Rocket Science windows.
 The folder pane
The folder pane contains three types of items: Publication targets, HTML files and File folders. Each Rocket Science project consists of at least one publication target (the first item in the tree) and one or more HTML folders; file folders are optional and can be added as needed.
Publication targets
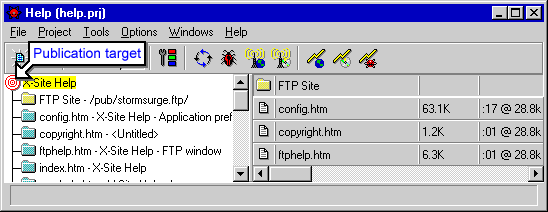
The first item in the folder pane is always a publication target, which is associated with a particular web server and/or publication directory. If you are publishing to the internet or an intranet, the target will be associated with a web server. If you are publishing for CD-ROM, the target will be associated with a directory. If you are publishing for both the Internet/intranet and CD-ROM, the target will be associated with both a web server and a directory.
The initial target is created automatically when you create a new Rocket Science project. You can use the Project/Add/New publication target to project... menu item to create additional targets if you want to upload your project to multiple servers. For example, you may want to "mirror" a web site on multiple servers, or span a web site across multiple servers.
When a target is selected, the pane on the right displays an overview of the files that will be published to the target, showing the size and approximate download time for each HTML document. The size and download time are calculated based on files in the document that are transferred from a web server to a web browser application when a user asks for the document. For example, this includes items such as the HTML document itself, the background image, inline graphics and Java applets. Items that are not downloaded until the user specifically requests them, such as .ZIP files and CGI-BIN scripts, are not included in the calculation.
You can add HTML documents to a selected target by choosing the Project/Add/New HTML document to publication target... menu item, and you can add new file folders (see below) to the target by choosing the Project/Add/New folder to publication target... menu item.
You can change a target's properties by clicking on it and selecting Properties... from the speed menu to display the Target properties dialog.
HTML files
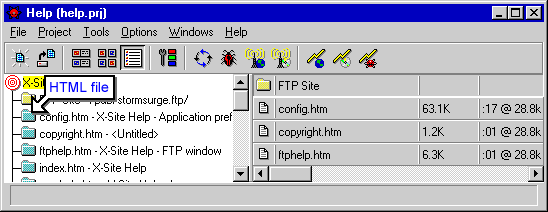
HTML files are displayed as green folders, and represent your HTML source files. If you are publishing to the internet or an intranet, each HTML file will be associated with an HTML file on a web server.
When an HTML folder is selected, the pane on the right displays the contents of the folder, showing the size and download time for each file referenced in the HTML document.
You can delete the reference to a selected HTML file from your project by choosing the Project/Delete selected item from project menu item or by pressing the Delete key. You can delete both the reference and the HTML file to which it refers by choosing the Project/Delete selected file from project and disk menu item.
You can edit the HTML document that is represented by an HTML folder by double-clicking on the folder or by selecting the Project/Edit selected file menu item. You can view the document by selecting the Project/View selected file menu item. You can simultaneously load an HTML document into your Web Browser and HTML Editor by selecting it and pressing the Enter key.
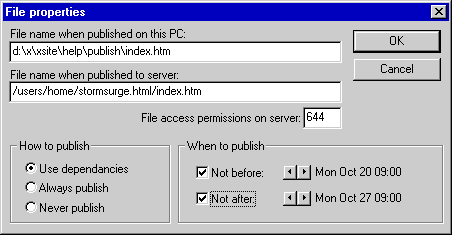
You can change an HTML file's properties by clicking on it and selecting Properties... from the speed menu to display the File properties dialog.
File folders
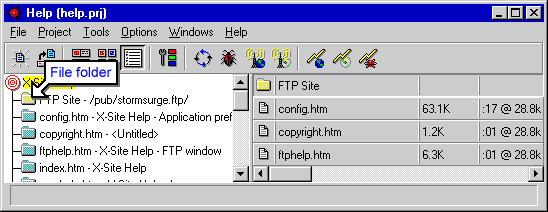
File folders are displayed in yellow. You can use file folders to include items in your project that are not referenced within any of your HTML source files and therefore would not ordinarily be published to your web server since they are unknown to Rocket Science. For example, let's say that you have a ZIP'ed file that you are allowing users to download from your FTP site. The reference on your HTML page would look something like "<A HREF="ftp://www.mysite.com/myfile.zip">", but the actual file on the server would be something like "/pub/mysite/ftp/myfile.zip" and would not appear as such anywhere in the project. When reading the HTML source, Rocket Science can figure out that there's a file name "myfile.zip", but it has no way of knowing where it is on your hard drive (although it will try to find it in the project directory) or where to put it on the host since the HREF does not contain that information. To deal with this situation, just add a new folder to your project in the Project Window, associate the FTP directory on the server with the folder and add the file to the folder. In the above example, you could create a folder named "FTP", associate it with the server directory "/pub/mysite/ftp", and add the file "myfile.zip" to the folder.
When you create a new project, Rocket Science automatically creates a file folder for CGI-BIN files; items that you add to this folder will be uploaded to your CGI-BIN directory on the server. You can create your own file folders by selecting the Project/Add/New folder to publication target... menu item.
When a file folder is selected, the pane on the right displays the contents of the folder, showing the size and download time for each file in the folder.
You can delete a selected folder from your project by choosing the Project/Delete selected item from project menu item.
You can add files to a selected folder by choosing the Project/Add/New file to folder... menu item.
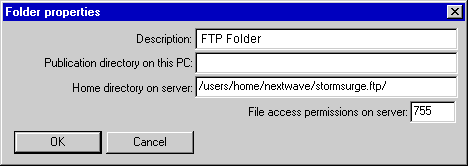
You can change a folder's properties by clicking on it and selecting Properties... from the speed menu to display the Folder properties dialog.
 The document pane
The document pane displays the contents of the publication target or folder which is currently selected in the folder pane. Each item is displayed on a tile. You can edit the file to which an item refers by double-clicking on the tile, or by selecting the Project/Edit selected item menu item. You can delete the item from your project by selecting the Project/Delete selected item from project menu item, or delete both the item and the file to which it refers by selecting the Project/Delete selected item from project and disk menu item. Don't forget to right-click with the mouse and use the speed menu, it's your best friend!
There are three different view styles available in the document pane. You can change the view style by selecting the Options/View menu item on the Project Window menu bar, or by clicking one of the view-style buttons on the Project Window toolbar. The following view styles are available:
- Thumbnails + descriptions - For graphics files, a thumbnail image is displayed on the left side of each tile, while the file size, download time and image-specific information are displayed on the right. If the image is in a format that can be
displayed by most web browsers (i.e., GIF or JPEG), an inline image graphic will be overlaid onto the thumbnail. For non-graphics files, an icon representing the file's type is displayed on the left side of the tile, and the file size and download time are displayed on the right. If the file is an HTML document which has been modified, the icon will be overlaid with an update required graphic, indicating that the folder size and download time may not be correct.
- Thumbnails only - For graphics files, a thumbnail image is displayed. If the image is in a format that can be displayed by most web browsers (i.e., GIF or JPEG), an inline image graphic will be overlaid onto the thumbnail. For non-graphics files, an icon representing the file's type is displayed. If the file is an HTML document which has been modified, the icon will be overlaid with an update required graphic, indicating that the folder size and download time may not be correct.
- Descriptions only - For graphics files, the file size, download time and image-specific information are displayed. For non-graphics files, the file size and download time are displayed. If the file is an HTML document which has been modified, the text will be red, indicating that the folder size and download time may not be correct.
Rocket Science checks each of your HTML documents each time you return to the project window to see if it has been modified, and automatically reloads it to reflect the true size and download time, so you should normally not see the update required indicator. If you do, you can manually update your project by selecting the Project/Refresh project menu item on the Project Window menu bar, or by clicking the Refresh project button on the Project Window toolbar.
If you are using a document pane view which displays thumbnails, and you switch to an image editing application to edit an image file and then return to the Project Window, the letter "U" will appear over the image's thumbnail. This indicates that the file has been changed and must be "U"pdated so that the thumbnail reflects what is currently in the file. You can update the thumbnail by selecting Project/Update selected thumbnail on the Project Window menu bar, or by selecting Update thumbnail from the speed menu. Rocket Science does not automatically update the thumbnails since this can be a lengthy operation if you are working with large images, and this allows you to decide how to best use your time.
 Project Window menu items
Remember, there a multiple ways to access just about everything in Rocket Science. For instance, if you have selected a file in the document pane, you can send it to an editor by selecting the Project/edit selected file menu item on the Project Window menu bar, but you can also edit it by:
- Double-clicking it
- Pressing the Enter key
- Dragging and dropping it into an editor
- Clicking the right mouse button and selecting Send to from the speed menu
Since you can perform any project operation from the Project Window menu bar, we'll give you a walkthrough of everything that's on it, and you can decide later which shortcuts you want to use as you work with Rocket Science.
- File
New project file
Displays the Target preferences dialog and allows you to create a new Rocket Science project.
Open project file...
Displays the Open file dialog and allows you to select and open an existing Rocket Science project file.
Save project file
Saves the current project to the hard drive.
Save project file as...
Displays the Save file dialog and allows you to save the current Rocket Science project file under a different name.
Import
Directory as new project file...
Displays the Target preferences dialog and allows you to create a new Rocket Science project, specifying a directory which already contains HTML files as the source. Rocket Science will read the files and construct a new project based on their contents.
Web site as new project file...
Displays the Target preferences dialog and allows you to create a new Rocket Science project, specifying a web site URL as the source. Rocket Science will download the web site onto your hard drive and construct a new project based on its contents.
Export
Project to directory...
Displays the Select a directory dialog and allows you to select a destination directory, then copies all of the source files in the current project to that directory. This feature can be used to archive a project.
Project file names to listing file...
Displays the Save file dialog and allows you to create a new file, the writes the name of each source file in the current project, along with project statistics, to the file. This feature can be used to document and archive a project.
Print
Sends project statistics and a list of all source files in the current project to the printer.
Printer setup...
Displays the Print setup dialog and allows you to select a printer and set options for the printer such as paper size and orientation.
Exit Rocket Science
Terminates the Rocket Science application.
- Project
View selected file
Sends the selected HTML file to your web browser application.
Edit selected file
Sends the selected file to the application which you have configured to edit that type of file. If there is no editor configured to handle the file type, Rocket Science will ask Windows to launch an appropriate editor application.
Upload selected file
Unconditionally uploads the selected file to your web server, even if it hasn't changed since the last time you uploaded it.
Add/New publication target to project...
Displays the Project settings dialog and allows you to add a new publication target to the project.
Add/New folder to publication target...
Displays the Folder properties dialog and allows you to add a folder to the currently selected publication target. The folder will be associated with the server directory which you specify in the Server directory field; any files that you put into the folder (see the next item below) will be copied into this directory when you upload the project.
Add/New HTML document to publication target...
Displays the Open file dialog and allows you to add one or more HTML files to the currently selected publication target.
Add/New file to folder...
Displays the Open file dialog and allows you to add one or more files to the currently selected file folder. Note that there is a difference between file folders (which are displayed in yellow) and HTML folders (which are displayed in green). You cannot add files to an HTML folder, since it is really a representation of an HTML file. The contents of an HTML folder are determined by the source code in the HTML file which it represents.
Delete/Selected item from project
Deletes the reference to the currently selected target, folder or file from the project. If the item is a file, the file itself is not deleted from the hard drive, it is simply removed from the project.
Delete/Selected item from project and disk
Deletes the reference to the currently selected target, folder or file from the project. If the item is a file, the file itself is deleted from the hard drive.
Update selected thumbnail
Updates the thumbnail image for the currently selected graphics file.
Update all thumbnails
Updates the thumbnail images for all graphics files which have been modified since the thumbnail was created.
Refresh project
Scans all modified HTML files to display correct file sizes/download times and creates thumbnail graphics for all graphics files.
Browse
Web site on server
Displays the web browser window and loads the home page from the server. The URL that is used here is entered in the URL field of the Home Page section of the Target preferences dialog. This feature is used to view a web site that is being published to a web server for use on the internet.
Web site from publication directory
Displays the web browser window and loads the home page from the publication directory on the hard drive. The file name that is used here is entered in the Publication directory on this PC: and Home page's file name on this PC: fields of the Home Page section of the Target preferences dialog. This feature is used to view a web site that is being published to a local directory for use as a CD-ROM- or intranet-based web site or an HTML help project like the one you are reading now.
Web site from project directory
Displays the web browser window and loads the home page from the project directory on the hard drive.
Publish
Upload project to server(s)
Uploads all targets in the current project to their respective web servers. Only files which have changed since they were
last uploaded will be sent.
Publish project to publication directory(s)
Uploads all targets in the current project to their respective publication directories.
Clear all file dependencies
Rocket Science keeps track of the last time you uploaded each of the files in your project, and will not upload a file unless it is newer than the copy on the server. You can select this menu item to clear the date dependencies so that all of the files in your project will be sent to the server the next time you upload the project.
Set all file dependencies
Rocket Science keeps track of the last time you uploaded each of the files in your project, and will not upload a file unless it is newer than the copy on the server. You can select this menu item to "start over" and reset the date dependencies so that none of the files in your project will be sent to the server the next time you upload the project.
- Tools
Note pad
Displays the note pad for the current project in whatever application you have configured as your HTML editor.
Project statistics
Displays the Project statistics dialog which displays information such as when the project was created, when it was last uploaded, etc. The Total time in use is a running total of how much time you have actually spent working on the project, and can be used for billing purposes. To changed the this number, just type the new values into the hour and minute fields.
Check project for errors
Checks the project for HTML syntax errors, broken links, missing or unreadable files and conformance to 3WC, Microsoft and Netscape standards, then brings up the Messages Window to display the results. If you are using HyperText X/Press as your HTML editor, you can double-click on error messages in the Messages Window to go directly to the offending lines of source code in your HTML documents.
Clean project directory
Allows you to remove "dead wood" from your project directory by displaying a list of all files in the project directory which are not referenced within your project and allowing you to select those that are to be deleted. If the Back up files before deleting checkbox is checked, Rocket Science will create a subdirectory named cleaned beneath the project directory and move each file into the subdirectory rather than deleting it forever.
Create site map
Generates an HTML document containing a clickable directory-tree-style overview of your project and adds it to the project.
Create table of contents
Generates an HTML document containing a clickable table of contents-style overview of your project and adds it to the project.
Create index
Generates an HTML document containing a clickable alphabetical index-style overview of your project and adds it to the project.
- Options
Application Preferences...
Displays the Application preferences dialog and allows you select colors, fonts, tools, etc.
Target preferences...
Displays the Target preferences dialog and allows you to change the name of the project. To change target-specific items such the target name, web site URL, etc., right-click on the target you wish to modify and select Properties... from the speed menu.
View
Thumbnails + descriptions
Files in the document pane of the Project Window are displayed as a thumbnail graphic accompanied by a description of the file.
Thumbnails only
Files in the document pane of the Project Window are displayed as a thumbnail graphic.
Descriptions only
Files in the document pane of the Project Window are displayed as a text description of the file.
- Windows
Show all windows
Restores and displays the window of each currently running tool application. Tools are configured in the Tools section of the Application preferences dialog.
Hide all windows
Minimizes the window of each currently running tool application. Tools are configured in the Tools section of the Application preferences dialog.
Set web browser size
Allows you to set the size of the web browser's window to one of several standard screen sizes for document previewing purposes.
 Working with Rocket Science files
Just in case you're curious about what's in all those files in your project directory, here's a quick rundown:
.PRJ files are Rocket Science project files, and have a .prj extension. A project file consists of a list of publication targets, each of which references one or more HTML files, each of which references other files such as .GIF and other HTML files. The project file's header also contains information about how long the file has been in use, when the project was last published, etc.
Hint: Each time Rocket Science saves a project file, it saves a copy of the old file with a .bak extension. If you ever end up with a bad or missing project file, try opening the .bak file to recover your data.
Hint: Newer versions of Rocket Science may not be able to read project files that were produced by older versions of Rocket Science. To quickly rebuild your project file, try to open the old file, and the select the File/Import/Directory as new project file... menu item to import the project directory into the old project file.
IDE.UPL contains upload dependancy information. When you upload a file to a web server, the file's name along with the date and time it was uploaded are written to the .UPL file. The next time an upload is requested, Rocket Science compares this date and time with the date and time that the file was last edited. If the file has changed since it as last uploaded, it is sent to the server. If the file has not changed since it was last uploaded, it is not sent to the server. This is called Dependancy checking.
IDE.LOG is the file in which the messages that are displayed in the Messages Window are stored.
IDE.THM contains thumbnails of all of the graphics files in the directory in which it is located.
IDE.XFR is an intermediate file which is used to upload files to a server. Rocket Science copies an HTML file into this file while replacing and expanding X/Pander macro tags, and the file is then sent to the server under a different name.
IDE.HTM is an intermediate file which is used to view your pages in a web browser. Rocket Science copies an HTML file into this file while replacing and expanding X/Pander macro tags, and the file is then sent to the web browser.


